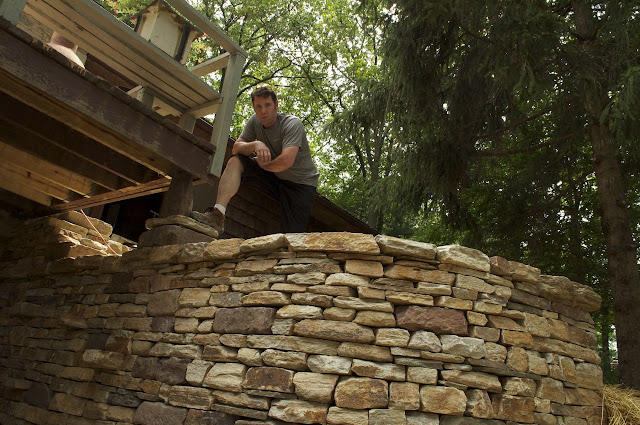
It's always bittersweet when I finish a job. I develop a great relationship with all my customers. Some even treat me like family bring me sweet ice tea and offering lunch from time to time. I love my job.

The client had an existing retaining wall made from railroad ties. For over 40+ years this has helped keep earth back. But the time had come when the wood had run its course. Ready for a new replacement, the homeowner considered and priced out pavers for the low cost of $4500. But when she gave more thought to the idea of a replacement she realized that nothing fits better then natural stone. The house was built with Butler stone, so why not build a retaining wall with Butler stone?


The sketches of the retaining wall.
The retaining wall includes 6 elements:
1) a retaining wall with a 1:5 pitch.
before
after
before
after
3) 3 Steps to the upper porch
before
after
Great colors- I love how they twinkly.

5) 5 protruding stone shelves. (for candles)
before
after

6) Curve in wall


Oh wow that is amazingly beautiful!!! Mark you really did an excellent job!!!
ReplyDeletepamela
Wow, this is totally amazing. Hard to believe that you did all that on your own.
ReplyDeleteKirstie
Absolutely beautiful - a total work of art. LOVE IT!!!! This would have looked so good at my parents old house where they had a similar set up with a walk out basement. They started out with rail road ties and later used broken concrete. It didn't look nearly as nice as this!
ReplyDeleteThank you Pamela! Feels amazing to have it done.
ReplyDeleteHey Sis! Not as amazing as you with being USDAA Dog Agility Judge. Not to mention how great you work with Shelties. Just like all things some times just one is better then a army! This way no one bumps elbows. www.roakknoll.com
ReplyDeletePaintCrazy- Have horse will travel!! Ha ha, Ya Rail road ties may have a place under rails- but not in walls. Broken concrete at least this is one great way to give a second life to landfill material. I have seen some amazing things with recycled concrete. Thank god my walls can be taken down any time and re used else where if needed. No landfill trips needed.Walls with out mortar is like horses with out shoes.
ReplyDeleteExcellent work. What is the depth of the wall at the bottom, and what did you use for the base and in the back of the wall?
ReplyDelete3" ft plus wide. 6"-8" stones for base on earth. #2 aggregate 3" stones behind wall as I built up. Little over kill. I also use the #2 for packing stone. The next blog will show the progress.
ReplyDeleteTasty job Mark, always rewarding to look back at before and after shots.
ReplyDeleteReally beautiful wall i want to follow. I am in the process building a 2.5' high, 1.3' wide and 73' long dry stack retaining wall. I didn't see any small shim on your wall. Does that mean we allow a slightly wiggle piece as long as it sets firmly on top of others? That wiggling piece will not wiggle anymore after other pieces set on its top, I think.
ReplyDeleteAnother question is do we need to make each stone level? Many people say it will be better to make each piece level or slope to center. I did see any small shim on you wall. How can you achieve this?
I wish I could build a wall like yours.
James send some pics. Love to see what you are working on. Correct no shims, chinks, pins....ect just a few plates. Since Butler stone is a Gauged stone I don't get a lot off wiggle. But I also spent a great deal of extra time to avoid this. Over time a shim may fall out or break if the stone (shim/pin) is to small.
ReplyDeleteDifferent types of stones will have different required building specs& styles. Such as a football shape stone will have other issues. I will write a blog on some of the things I have learned from different stones I have worked with.
As for level yes this is correct. You work to help make every stone level when you can. Once again a star maybe hard to make level. So you will always have different shapes to work with. Following the 4 rules you will help make the best of the stones you have to work with. Take a look at my project pages to see some of the different styles of stone.