Wednesday, June 3, 2020

Day 21 - Westminster MD - Step 4 Finished

Little by little I'm getting to the top step 4 of 9! I started off the day working on setting up the upper patio. I needed to get a sense were I was going and check all the grades with the Zip Level. I also want to take a moment to let everyone know I have included Amazon links to help those interested in the tools I use. With our purchase I will receive a small portion of the sale to help support me. Thank you

Buy Now Amazon:  ZIPLEVEL PRO-2000 High Precision Altimeter


Upper patio space getting mapped out.


Next did a quick check with the tape measure. I was 10 feet away from the top. Lots of extra space to work with. Currently there was really no upper patio. The goal is to give a bit more room when you step off the porch. 

All my rebar rods I like to use duck tape to mark where my string lines go. This way if I need to remove them I can always place it back on the rebar where the tape is. Simple system that works well every time. 

Buy Now Amazon: Rite in the Rain All Weather Pen no. 37 Black Ink


Now if you can make heads or tales of my measurements thats amazing! These are just some quick notes to help guide me on the road map to the top. 


Buy Now Amazon: Johnson Level & Tool 595 Structo Cast


I wanted to take a moment to share a very simple tool that can help when your working on patio or steps. You don't need a Zip Level when you can keep it simple with a little string and line bubbles. The yellow one is nice because it show fall such as 1/8, 1/4.....

Buy Now Amazon: Swanson Tool LLA001 4-Inch Aluminum Line Level


Every day the property owners daughter Rachel brings me little snacks. Today took my snack break early to build my mini steps and stone wall. Yummie! 

Once I finished up doing all my measurements to the top patio. I then began working on feather and wedging the last stone I set yesterday. I needed to make this into 2 stones. I would then take the back piece and place it next to the front. These will be the underneath of the 4th step. 


Buy Now Amazon: Estwing Drilling/Crack Hammer - 2-Pound Sledge


Buy Now Amazon: Slim 25” Durable Telescoping Magnetic Grabber/Retrieving Magnet

Everything worked as planned. I just wanted to show how I use the magnet tray store my feather and wedges. Along with the retrieving tool to gather them when they fall. I try to get them up as soon as I'm finished not to loose any. 

Buy Now Amazon: Honda EU2200i 2200-Watt 120-Volt Super Quiet Portable Inverter Generator


Next it was time for low voltage pipe #4

Then gravel on the back of the lower steps.

Now I was ready for the top tread. This was 55" I only needed 48". I was so excited the only thing I noticed was a fracture crack on the front. So I started tracing it only to find one in the middle. Well this stone was a real dud at that point. It was off to the stone splitter for what ever happens. 


Got it in and it did split in half on the middle fracture crack. This would be the right side of the 4th step. Beautiful colors on the face. Size wise only around 24" long it would work. 

You can see it sitting in the photo. Next it was time for something at least 36" long to run past my wall line. I found this stone would work just right. 

I placed it on the 4x4 and a sheet of plywood to bring it up a little higher along with the rollers to get it all lined up. Next it was time for a cut with the gas saw. 


Everything worked as planned. Next it was time to lift it and remove all the wood underneath of it. 
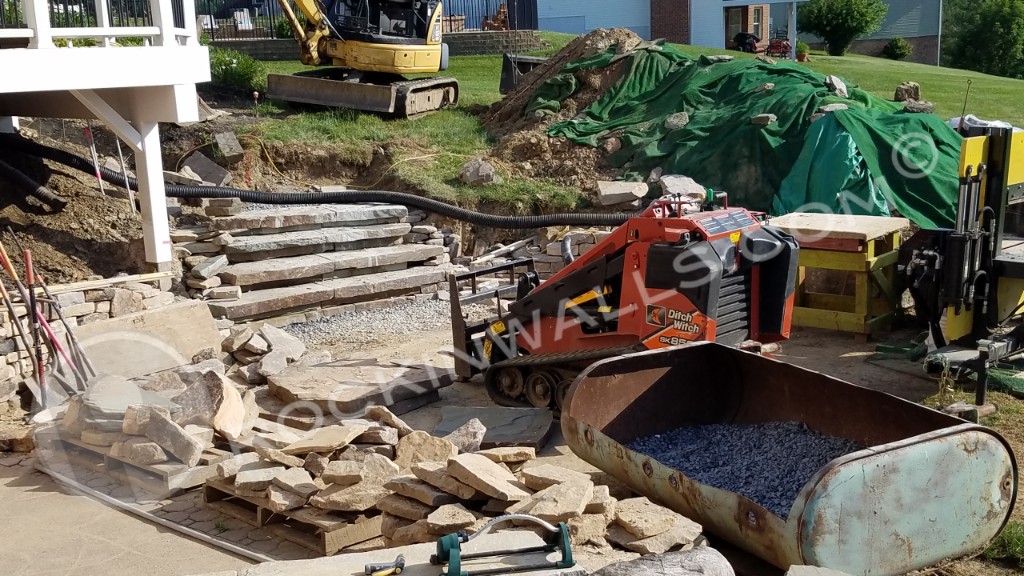
End of the day it was time to go home. It was the hottest day so far. The small breeze sure did help. 

Tuesday, June 2, 2020

Day 20 - Monday - Westminster MD - "still steppin' it up!"


Today was another day for steps. This image was of course the end of day. In this blog I'm going to show a few things I've talked about in earlier posts. I really tried to capture more images to cover some of these techniques/tips I've covered. 

I started off the day moving some of the blue stone pattern to the top of the hill. Keeping it out of my way and also to help to get some of the grass to pop pack where it was sitting. 

Blue Stone sheet stock
I wanted to take a picture of the blue stone sheet stock. Mainly so viewers could see what I'm starting with to make my steps. As you can see they are all different sizes and shapes. For the most part these range in thickness from 3"- 4". I'm doing my best to build 7" rise per step. This is natural stone....lol nothing is exact-I'm very much on the money! 


I set one of my first double stacks for the day only to see how tall it was. I wasn't so happy I had to pull this one since it was a little to tall and long. I went looking for something better.  

I found a pre cut scrap I had on a pallet. Perfect! The only things I had to do was remove or dress out a little of the drill marks from previously being feather and wedges. I also had to grind the top down just a hair on the right. I then built with stone on the back into the bank. Since this was a little smaller on the back end. Then moved on to working on fitting the low voltage pipe.

After that was all set I did a bit of hand digging in order to feed another pipe down the middle of the joint. In this image you can see my favorite little hand digging tool from Ames (I'll put a link soon). I also love to use the green astro turf. This is wonderful for all kinds of things. Here I'm simply using it to keep the dirt out of the wall stone.  

Next it was time to connect the pipes with 3 in 1 spray and then bend the pipe with the heat gun. 

After completing the double stack bottom course. I then went looking for a little thinner top step in order to stay on target for my over all heights. Each step should be 7" if one steps gets to tall then this will threw me off further up. I have a top patio height of 64"+/- 7"x9 steps.... also you may have remembered from yesterday the Zip Level was at 18.3/8". By the time I set this step I want to be at 21" inces being the 3rd step. This was just the size I wanted the only issue was I had to use both the tracer and pointer to give it a little smoother straight face. For those learning to shape on little pro tip when working a area always chisel in not out. If you chisel out you are more likely to take off a lot more of the stone then you planned. With this I started with the tracer to get my straight line. I ended up with a few stops which were bull noise. Think of this as point of the stone sticking out. The pointer is a chisel looks a lot like a carpenter's pencil after you sharpen it with a pocket knife. The pointer lets you take of the points for ease of explaining. 

In this image I've used the pointer chisel to remove all the major bull noses. 

Next it was time to set the stone up on top. 

As soon as I set it on the stone from yesterday. I was able to feel and see the high spots. Which it was spinning and rocking. As circled in red.

Next it was time to grind them down with the 7" grinder. 

After placing it just how I wanted with my PVC 1" rollers. I then placed my level under to make sure I had the overhang I wanted. I talked about this before but don't think I had a great photo to show exactly what I meant. 

Then it was time for the right top 3rd step. This photo I also wanted to show what I talked about before using 2 of the 4x4 to set the stone on. Next to but over top of the step. You will also see on the right 4x4 the door stops. This is helping me make the stone level. I line everything up, the front face the amount of over hang. 

I then use a metal square to work of the edge to mark out with a sharpie or crayon. The line where I plan to cut.

I do my cut from the top stone all the way to the bottom stone which I'm overhanging - the left step. I can then remove the cut piece and slide the right step away. Finishing off by now using the line to finish cutting the left step. 

I then remove all the blocks under the step. By using the 6x6 which I had talked about before with the missing section. No this is my favorite block. Any block will do even a stone will work. 

Once next to one another. I like to come back in with a tracer chisel to remove the crisp saw line. Now one thing to keep in mind if you have a larger tread (step) you really want to do this before you set in next to another. WHY? If stone slivers fall into the joint it could keep the two stones from making good contact until removed. If this is a heavy step this can be a real challenge. Chisel before setting. 

In this image I'm simply showing how I built back with stone and on the sides where my walls will be. Next I'll fill in the remaining space with 3/4" washed gravel. 

Before calling it a night. I picked the next thin under step stone for #4 lined everything up for cuts on Wednesday. But before I do all that I'll be setting my top line to make sure I have the correct tread width along with the needed height to get to the upper patio space. You can also see I did a little build up on the sides by the steps with stone. In prepration for walls to come after the steps are finished. 

Thats a wrap.

Monday, June 1, 2020

Day 19 - Westminster MD - "2 Steps - 7 To~Go"

The end of the day always comes so quickly when the sun is shining and I'm on a roll! I've completed 2 of the total of 9 steps to get to the upper landing. Each of the steps has rise of 7" +/- and a tread ranging from 15" - 22" on average I'm shooting for 17". I'm also doing me best to have them pitched out in order to have water run off them. The good news is they are all set in a 3/4" gravel so the will naturally drain. The step design is what I call a double stack. 2 stones to make the desired height. These stones are a called Blue stone sheet stock. I have them over hanging about 2"+. More or less I simply use my level to be my measuring device for each one. Each stone must be custom cut and grinded down in order to make such a tight fit. I'm also adding low voltage piping in the middle of each tread. This way I can either do a under light or several. The pipes will direct the wire to come out right between the joints under the overhang of each tread. Now on to my day pic by pic details. (if you're reading this and have not been following the daily updates on Facebook go there now to get caught up. At some point I'll be moving each day over to the blog)

I started off with the second step I had set on Saturday. The stone had a major bump in the middle. It would just sit there and spin in circles it was so bad. So I had to lift it up and grind it down. I like to use the Ditch Witch an a board to minimize the stone being lifted up from pushing out the lower stones. Never fun when that happens to you. ONLY has to happen once then you learn.

After getting the second step left completed. I then moved on to digging back the bank. More for the next step to the right. Along with the stone wall which would follow up the side of the steps. I only like to dig out as I go to minimize over excavating. It's wise to set all stones on good solid compacted soil. (with gravel as needed)

Then I picked out the next stone for the right side of the steps. I placed my pvc rollers in place under the stone setting. This allows me to move the stone around to see what it looks like. Now before I get to carried away this stone had 4x4 boards underneath it with the rollers on top of them. The reason for this is  so I could overlap it on the stone next to it. As seen in photo below. This allows me to line up the face on my marker line on lower steps. I make sure I have enough overlap then I cut it with the gas saw. When the saw cuts the top stone it then leaves the mark on the bottom stone. The bottom stone is really the left step. I then finish cutting to allow for a tight fit. 

Over lapped stone on right sitting over top stone on left. 14" gas saw with water ready to cut. 

You can see just how tight the cut was by doing this. I then had to grind of a another high spot on the bottom of this stone in order for it to sit lower and not rock. Of course that means lifting it up then setting it down to test it. Then repeat as needed. I'd guess these stone come in around 300 lbs. I'm using a 7" grinder with the 7" Dewalt Diamond double cup wheel. This works the best to really take down high spots. I'm also running a dust collector in order minimize airborne dust. You will also see in the photos several wood blocks. Left to right - 4x4 use 2 of these when setting down a stone, (middle) 6x6 with piece missing this is my digging bar block, (right) small door stops made out of 2x4 doubled up - used to make adjustments when setting caps or steps to be level or to just to get the rollers out without pinching my fingers. 

I did some grinding on the top of the back of this stone for the 3 step face to sit. I also put the board down in order to help when dig. This keeps the dirt from mixing into the gravel. The stone was longer then what I had excavated. 

Strapped in the next stone before calling it a day. 

Only issue with it was I had to dig out more of the back. So I placed it on the 1" PVC rollers to slide it around. I also used the digging bar to place it onto the line. This one is set 22" back on the left to help direct the steps to the right, as they go up the hill. The middle of this stone comes out to 17" for the tread.

Everything is now set and marked out. Next up the right side! To the left at bottom of white pole you can see my 4 rollers along with my collection of door stops. 


Next many of you have been seeing the Zip Level in many of my photos. I wanted to take a moment to explain how I'm using it with the steps. In this image the little square box is the digital readout. In the cord inside the carrying unit is fluid. This works a lot like a clear hose with water in it. Essentially its a water level. Where the box is sitting is the top of the patio. Next I ZERO IT OUT, I then can set it on any step or top of area by porch to see how I'm doing. I'm I on track with the sizes of each step. You don't want to get to the top only to find out you are to short or to tall. Hard to pull them all apart then start all over. 

ZERO - top of patio grade.

Second step at back

3rd under step 3, This means I need to find a stone which is -3" in order to be on target with a 7" rise per step. As you can see it really takes all the guesswork out. Easy to set up and easy to read. You can change the read out to multiple options, meters, feet,  etc....

Coming along 1 by 1. The space is really starting to look like something. One of the things I love about natural stone compared to pavers. They are not square. YOU have endless opportunities to create just about anything. I like to like to let the stone tell me what it wants. 

End of the day the empty oil tank with gravel now gets to go back to the farm for a refill. The tools head back to the job trailer. Everyone is happy.  

3 pallets and 1 oil tank off Richard's grass. Ready for road trip. 

Everything tucked in for the evening. 

Carbide Chisels For Sale, Masonry Tools

2020 Instock for sale Carbide Chisels


Spartan 1 1/2 Heavy Duty Carbide Chipper 1" stock $95.00
Made in Georgia

The chipper is a great chisel for directing energy out. For example if you have a stone with a extra ledge or you would just like to make a cleaner face. This is the chisel for you. Great for shaping cap stones with less chance of undercuts.  2-2.5 pound hammer suggested no more. Lighter hammer means less body fatigue. 


Spartan 1 1/2 Carbide Tracers  1" stock $85.00
Made in Georgia

This is the narrowest Tracer on the market today.  Great for splitting stones, shaping,  and so much more. For me this is my go to must have! Does just about everything! If you can only afford one carbide tool. This is the first one to add to buy to get you started. 2-2.5 pound hammer suggested no more. Lighter hammer means less body fatigue. 


Rebit 3/8" Carbide Pointer 1" stock $80.00 # PKM25
Made in Sweden

I've owned a small pointer from for some time. I rarely used it based on my flat bedded stones. But over the years I've come to understand just how important this tool can be.  Removing small little bumps or areas you just can't work with wider chisels. The pointer is just that it digs in where you need it to. Once you open up an area often you can come back with a larger faced chisel,  like the chipper or tracer to clean up the surface. The Rebit hands down doesn't get any better since it has a beautiful directed flat point design. This keeps the energy from shooting the chisel off the stone as you work. 


We also stock the: Spartan $95 - 3 pound shaping hammers.
________________________

As all good tools these were recommended to me by a certified waller.  Who has spent countless hours shaping, shaping and shaping. When you find incredible tools you like to share them with your colleagues. I've owned my first set of Carbide Chisels for over 10 years. They still work like new when properly sharpened.  

When you take a workshop at Rockin Walls Training Center you get to do just that. "Try Before You Buy" tools.  The only training center in the US which offers this amazing opportunity to try the best of the best. Allowing you to pick what works best for you. See our sponsors page for more information and links. 

________________________

Call or email Mark@RockinWalls.com if you have any questions. 

Tools can be purchased by check. Priority Shipping available for all US residents. No overseas sales.  Maryland residents please add 6% sales tax.

Paypal available add 3% handling fee to total. 

Local sales and pick up by appointment only. 

Sunday, March 29, 2020

Pro Series - Dry Laid Stone - Railing Rods - Plug & Play

Now if it was only as easy as it sounds! Should stand the test of time with no maintenance. Only time will tell.


This video covers how to create and install railings to a dry stone wall. This is a very simple but time consuming method using only gravity and friction. This design and application has endless applications. This is simply concept - idea which may help you and others. With alternative solutions for building custom handrails and railings for patio, walkways and steps to name a few. At all times appropriated PPE gear such as gloves, safety glasses, respirators, dust collectors should be used when working with cutting, grinding or shaping stone...etc. This was inspired by DSWA / DCS Mastercraftsman Neil Rippingale with a dry laid building structure built by DSC in Fairfield PA 2018. The design was build the rods into the wall in the middle of the packing stone. In order to help secure the roof to the dry laid stone structure. I never saw the rods in person nor how they built them nor installed them. A simpler method for wet work on another building built in the same area with lime in Fairfield PA. This information was shared by Seth Harris DSWA Waller. Both rods had been built with steel. Long term according to the builder of the project in which I was creating suggested we go with all stainless. The specs for this is: 3/8" stainless sheet cut into a 4"x4" square welded to 3/4" stainless steel all thread with stainless nuts welded top and bottom of plate as seen in video. A 1" carbide bit was used with a hammer drill in order to drill all holes. The rods and plates are set 3-4 course below top of build (including cap).

Tuesday, March 17, 2020

Pro Series - Characteristics Of Natural Blue Stone Pattern - Things to Consider - Patio Walkways


Pro Series - Characteristics Of Natural Blue Stone Pattern - Things to Consider - Patio Walkways.

This video about blue stone is intended to help contractors show potential clients natural blue stone pattern as an option for their patio/walkways. What the client can expect to see visually with natural stone and how its inherent characteristics should be considered.